jeudi 30 juin 2016

How to solve W202 W204 W207 ESL is damaged

Note:
It’s hard to buy Mercedes 204/207 EIS and they are expensive. If you have 204/ 207 all key lost, you are advised to use W212 EIS for replacement and the ESL needs to be removed.
MB NEC ELV
After renew with no luck? You are advised to replace ELV simulator as follows.
elv emulator
Most W204 W207 W212 ESL will damage with EIS. In this case, there are two possible reasons and solution:
ESL motor is damaged and need to replace a new motor
NEC chip is locked, theoretically it can be unlock, and actually it needs to replace new ESL.

How to tell if the ESL is damaged or NEC is locked?
Open VVDI MB Tool software, Click “Check ESL damage” and you will get any of following display:
ESL is working: means the motor is damaged and you need a new full set of ESL motor.
ESL is damaged: need to replace new ESL.
check-01
How to replace ESL with VVDI MB BGA Tool?
Step1.
Erase EIS, then re-write EIS and personalize ESL, finally ESL is synchronized. Note: if you not erase ESL at first, but only personalize ESL, the ESL won’t be synchronized.

To erase EIS, both Key password and Erase password are required.
1) For the key password, you can get it by adding keys.
2) For the Erase password, it can be automatically get out by VVDI MB tool at 90% percent success rate, if no success, email us the EIS data for help.
After input the two passwords, click "Save EIS data" then "Erase EIS"
Now the EIS is full new
pass-02
Step2.
Load EIS data
Tick "IR" to write EIS data and "OBD" to write VIN.
load EIS data-03
Step3. Click “Personalize W204 ESL”
Personalize W204 ESL-04
Step4.
Now, the options "Initialized", "TP Cleared" and "Personalized" are ticked, except “Activated”
Insert the original car key then EIS and ESL is in “Activated” status.
Finally renew ESL with success.
Personalize W204 ESL-05


When the W202/W204/W207 ESL damaged, you use VVDI MB NEC ELV adapter to work together VVDI MB BGA tool to renew, then use MB BGA tool to reprogram key.

mercredi 29 juin 2016

How to get the token reset button on genius?

Solution:
Aftercompleted setup, you need to manually replace raceloc.dll C:\Users\Your PC Name\AppData\Local\DimWare\RaceEVO\7.0
Fatal Error with be solved.
Instead of installing old version of race evo software, i have installed the latest.
Now there are more realistic results about this tool.
As you can see in pictures, firmware on the device IS 5.005 and available protocols now display correctly on the k-touch software.

http://www.wobd2.com/wholesale/new-genius-touch-map.html
genius 2
genius
Latest race evo Software + k-touch with instructions
http://www.chinaautodiag.com/download/raceloc.dll-for-win7-32bit.zip

Issue:
How to edit the file read with the NEW GENIUS china by WinOLS ?? how to remove the header to be recognized with the WinOLS and ecm Titaniun?
Solution: no need to extract the headder
when you extract files form k touch to pc and it asks you if you want a headder just say yes
and it does not put a header.
if you say NO then it puts headder

Done, hope it helps.

(Tested) Press and hold switch, apply power, waited 10 seconds pulled power out and removed clip. power up and 30


Upload the content of New genius CD for this tool.
Immagine
http://www.chinaautodiag.com/download/se128-1.zip
http://www.chinaautodiag.com/download/se128-2.zip
http://www.chinaautodiag.com/download/se128-3.zip
http://www.chinaautodiag.com/download/se128-4.zip
http://www.chinaautodiag.com/download/se128-5.zip
http://www.chinaautodiag.com/download/se128-6.zip
For xp user download: http://www.chinaautodiag.com/download/k-touch-xp-software.zip

For win7 user download:
Firstly download http://www.chinaautodiag.com/download/k-touch-xp-software.zip
Then download application “raceloc.dll” which is used to solve the Fatal error.
http://www.chinaautodiag.com/download/raceloc.dll-for-win7-32bit.zip
English version raceloc.dll
Copy Raceloc.dll to C:\Users\PC Name\AppData\Local\DimWare\RaceEVO\7.0
Race evo uses setting files in order to work. And you need valid license and hasp dongle in order to open the editor.

Issues and solutions:
Issue:
Device work ok. Read file ok. But do not export file to computer. do not export file to edit and tuning. software do not working dsmanager not working. Runsoftware windows error “fetal error in race 2000 loc"

mardi 28 juin 2016

How about OEM Orange5 Programming Tool

OEM Orange5
Original Orange5


Confirmed that oem orange 5 comes with immo hpx 9.0 and adapter set, I bought it and tested to review it, I list what I test and give a good and bad review as follows:
Right got this in today
very easy to install
all functions open 1 - 10 exept car radio get error
tested reading usual eproms all good
tested tms370 with adaptor board did not read so maybe bad adaptor board
tested immo login code from dump ,tms vw works
The adaptor solder ok
i run over it with iron
be summit else
no big deal
dont see many now
Read 1d69j adapter success (at the beginning I tried to read 1d69J with adaptor failed, well after resolder joints on hc05 adaptor get a perfect read 169dj).
BTY, Choose between clone or original?
Following parts are quoted, please be informed.
I was advised to buy original, they say it is not expensive for that money,and work everything from a list, have it over 3 years never problem...


My point of view is:
I'm electronican more than 20 years and i know what work or not with original and clone devices.
My budget is not unlimited, so like most peoples, we can't buy all original we need each time.
No one can use 100% each device he has. When we do this job, we need several device for 1 job.
So, if the clone can make one step that my others cannot do, i'm happy with that.
Importance is at the end, i make my job in time and earn my job money.
That is my expirience and my choice too.
and in that 3 years how much immo software has been added? They were the first main locksmith tool to write pcf7941 and still only 1 key supported.. just look at the ££
£££ MK3 must have made already.
I couldn't justify the cost of the original but will probably get a clone... maybe if the clone gets some use then might consider getting the original.

OEM china meaning clone device. Also listing show cannot update.
If you have no any experience with orange 5 , the original with adapter around thousand dollors.

lundi 27 juin 2016

How to change the odometer reading on a car engine

The question is :"Is it possible to change the odometer reading on a car mechanically? If not, what mechanisms are in place to prevent that from happening? "
Many odometer engineer reply:
Karl Walter:Turned wrench for a few decades.
"My knowledge ends at about 2004, so new cars may have more safeguards.
You can only lower the odometer reading on a mechanical odometer, and it usually requires taking it apart, because there is a often a ratchet inside that prevents simply driving it in reverse.  You can increase the reading on a digital odometer by providing a pulse, but it only up counts, the pulses have no direction.
You can try to over run the mileage eeprom register, and it might result in zeroing the mileage and counting up  again.  If display reads 999,999 maximum, then you can run the pulses at  the maximum the speedometer can detect them,.  I tested one from a late 80's gm car and it was around 600mph, so it would take over a month, and then who knows?  You might end up with an odometer that says 999,999 and goes no further.  You also might exceed the eeprom writes, and end up with who knows what number.  Imagine it's a lease car, and you owe $.25/mile on 900,000 miles.  You will have to sell your house.
Anyway, it's all illegal, unless you are replacing the odometer and you are matching the actual mileage, so don't do it. Plus, mileage is recorded when regestering, dealer service, and smog checks, so it's easy to get caught. --Karl"
Vlad Borsan "My car likes to break, and I like to fix it"
 "Of course it's possible.
Used car "dealers" in Europe do it all the time. And no matter how advanced the technology behind it is, there is always a way to trick it.
For example the newer cars have the odometer reading written at the same time in both the card and the electronic key.
The best way to tell the age and mileage of the car is to look on the actual car (not the odometer). My car for example now says ~250000km, but the body and transmission are way older (maybe 400-500K km), while the engine is definitely newer (was changed + does not yet have all the problems that a similar engine of higher mileage would have)."


More Product information Please search : WOBD2 (World OBD2 Auto Diagnostic Tool Mall) www.wobd2.com


vendredi 24 juin 2016

Nissan consult software is tested ok with can clip interface

(Verified) users get Nissan consult software installed successfully on Renault Can clip interface, after that they diagnose Nissan car models with the clip interface with luck and find it has exactly same function as Nissan consult interface.
They test ok using can clip interface (Item No. SP19-B) + Nissan consult software (Item No. sp38-b)
Can clip interface info: http://www.wobd2.com/wholesale/renault-can-clip.html
Nissan consult software info: http://www.wobd2.com/wholesale/nissan-consult-3-iii.html

More users prefer to this 2-in-1 full set:
Renault can clip and Nissan consult 3 2-in-1 at a cheaper price ($169 + shipping cost)
 can clip with consult 3
Read details on Renault can clip and Nissan consult 3 2-in-1:
Languages:
English, Finnish, French, German, Greek, Italian, Russian, Japanese, Spanish, Chinese (Traditional), Chinese (Simplified)

OS: Windows XP
Update: when the newest software is available, you will be informed.
Register SN: 926573

Note:
1). Serial number is 926573, can't work with any security card on our website, and it is without Bluetooth.
2). Renault and Nissan cannot be installed on the same laptop.

Consult 3 for Nissan Function:
  1. Swift Diagnosis and Swift Repairs through Automated Operations

The selection of CAN type as well as the identification of malfunction locations are completely automated, allowing CAN diagnosis to be done 17 times faster than previous method where the diagnostics system needed to be supplemented by the service manuals. Repairs involving reprogramming of the in-vehicle computer can be completed 1.5 to 2.5 times faster with the new system.

  1. Automated Self-Diagnostics

The system is able to perform accurate diagnosis without having to rely on the diagnostic skills of technical staff at the dealership. Increased efficiency in operations based on wireless technology. With wireless vehicle communication interface; it is possible to check the condition of the vehicle from either inside or outside the vehicle. At dealerships in Japan, it is possible to access the Nissan network to retrieve both the maintenance technology data related to the diagnosis results and spot adequate information on service manual. The dealerships are also able to access their service database and refer to the vehicle’s maintenance history on the laptop PC.

  1. Capable of Handling Multiple Complex Defects

The diagnostics tool is equipped with various functions including simultaneous self-diagnosis of an entire system, simultaneous data monitor for multiple systems, data recorder, and oscilloscope capability.

  1. Enhanced Data Management with Improved Laptop PC

New features such as adoption of color-screen and large-screen monitor allow viewing of large amounts of information altogether for enhanced data management

  1. Map Data Update Function for Hard-disk Navigation System

Through high-speed data update system, it is possible to update map data in approximately 20 minutes with the new CARWINGS navigation system (hard-disk) equipped in the all-new Skyline and other future products.

CONSULT: Computerized On-Board System Universal Tester.
CONSULT introduced in 1989,
CONSULT-II introduced in 1999.
CONSULT-III is 3rd generation model.
Communication distance: radius of 5m approx.

CAN Clip For Renault V157:

  1. Multi-Language: English, German, Danish, Spanish, Finnish, French, Italian, Norwegian, Dutch, Portuguese, Romania, Swedish
  2. Update: when the newest software is available, you will be informed.

Operating System: Windows XP

Can Clip for Renault Function:
  1. See all the information relating to the vehicle
  2. Computer test
  3. Automatic test of all computers
  4. Airbag test
  5. cantool (OBD tests)
  6. Base Doc (access to Technical Notes)
  7. Physical measurements
  8. Antipollution
  9. Multimeter

More Nissan consult  Renault Can clip information Please search : WOBD2 (World OBD2 Auto Diagnostic Tool Mall) www.wobd2.com

How to Use Auto Diagnosis Tool

If Your Check Engine light is shining like a beacon of bad news. What's going on? We'll tell you how to figure it out on your own, on the cheap.
You're tooling down the road; it's a beautiful, sunny summer day, and to top it off, your car is running absolutely perfectly.
Perfectly, except for that Check Engine light shining like a beacon of bad news. What's going on? The car still runs well and idles fine. Maybe it's an electrical snafu. It's sure to turn itself off at some point, right? Which it does. And then it comes back, sort of at random. Now it's time to pass the state emissions inspection to renew your plates, and your car ain't gonna pass with that light on.
 

BACK TO BASICS

In 1996 the EPA mandated that the computer interface for all vehicles sold in the United States meet a common standard. This meant that aftermarket repair shops didn't have to buy a half-dozen different $2000-plus scan tools, one for each brand of car they wanted to work on.
The standard is called OBD II (On-Board Diagnostics, version II). The fuel injection, ignition system and automatic transmission on most modern fuel-injected cars and trucks are run by one or more computers. These monitor sensors that collect data from the engine and other systems all over the car. The computers send commands to the fuel injectors and ignition coils to fire the cylinders. They use the data to fine-tune the combustion process with the correct amount of gasoline and the correct ignition timing to provide efficient, clean combustion for good power, economy and low pollution. There are dozens of sensors, measuring such things as throttle opening, engine rpm, air and coolant temperature, crankshaft and camshaft position, and road speed.
It's a sophisticated, high-speed system with a lot of self-checks to keep your car running as intended for a long, long time. Tuneups are kind of outdated these days because this computer system self-corrects the fuel mixture and ignition at every crankshaft revolution. This is much better than it was decades ago, when you'd take the family bus down to the garage for that annual tuneup.
Sounds great, right? And it is--until there's a malfunction. Often, your first indication of anything awry in the engine room is that Check Engine light on the dash. The OBD II standard tags this light as the MIL (malfunction indicator lamp). When that light is on, it means that the PCM (powertrain control module) is seeing data from some sensor that, well, doesn't compute--it's far enough out of bounds that the PCM doesn't know what to do. So the PCM guesses what should be a good number to substitute for the sensor's erratic output and presses on, getting you home from work. It also illuminates the MIL so you'll know something just isn't right. In spite of this, your car should run surprisingly well, although you may notice a slight loss of power and increased fuel consumption.
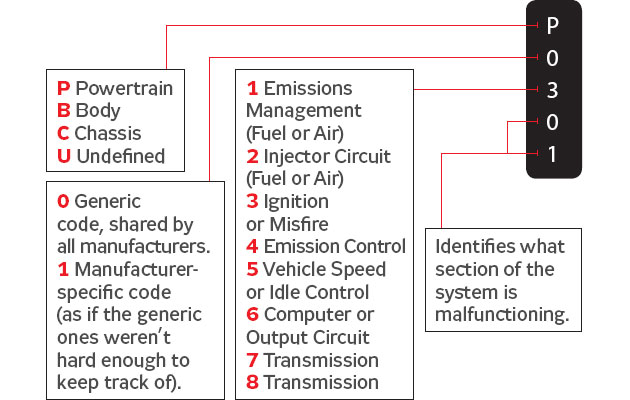
There's more. The PCM also stores a 
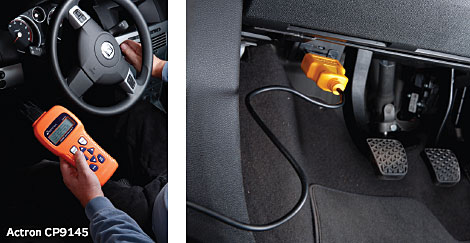
auto diagnosis "trouble code" so a service technician has some clue where to look for the problem. Scan tools, used to check these codes, were long the province of professional technicians because they were expensive and dedicated to one manufacturer's vehicles--a scan tool for a VW, for example, wouldn't work on a Chrysler. Scan tools are now inexpensive enough for car owners to buy. Prices vary from 20 bucks or so for a mindless code reader that only shows trouble codes, to maybe $400 for full-featured, upgradable machines with computer interfaces and multiple languages. Or, you may just be able to borrow a scanner from the auto parts store for an hour or two.
 54ca6c166d041_-_actron-cp9145-0708
Plug your scan tool into the standard OBD II connector under the driver's side dashboard. Turn the key and let the tool initialize, keying in any data it asks for, such as the VIN, make, model and engine type. Now you can read trouble codes, erase them, check to see if any readiness monitors aren't complete and even look at engine data in real time while someone drives the car.
 

CHECKING CODES

To get started, plug the scan tool into the OBD II connector under the dash. Turn the key on, but don't start the engine. The tool will ask for a number of things such as the VIN, the make and model of the vehicle and the engine type. Follow the onscreen instructions.
You'll get an option to check for trouble codes, as well as a couple of other menu choices. Some higher-end scan tools give you a text explanation of the code onscreen. Others give you a CD-ROM or just a paper pamphlet listing what the codes mean. Your best bet is to search the Web for a trouble-code list on a site that focuses on your particular vehicle--there will be information that might be far more helpful than just the code. When you read these codes, write them down before resetting the MIL indicator.
Inspection and maintenance (I/M) readiness will likely be another menu option. If you've turned off the MIL, your car needs to be driven until the PCM is sure that the fault has been corrected. How long? Every manufacturer has its own ideas, but a few days of normal driving should fulfill what are called I/M readiness tests. Why do you care? Because if you go to the DMV or an independent station for an inspection, the technician will plug in his own scan tool, and if your car hasn't passed I/M readiness, there'll be no sticker for you. I/M readi­ness is to keep people from sneaking a poorly running car through the emissions test by clearing codes just before pulling up to the DMV.
So far, an inexpensive code reader (less than $50) tells you all of this, and even lets you clear the codes and turn off the MIL light. Don't confuse a simple code reader--which is sometimes labeled a scan tool--with a genuine scan tool. A code reader, however, might be enough to catch most simple problems.

THROUGH A SCANNER DARKLY

Another menu option on your scan tool is to view data--here's the real functionality that can let you burrow down to the problem. You can page through the actual numbers the PCM is reading from the sensors. That allows you to check things like water and air temperature, oxygen-sensor function, engine load and rpm and a hundred other potential trouble areas. And you can do it in real time. There's also a freeze-frame function to trap that data when something hiccups while out on the road. You know, that misfire that goes away only when the mechanic is test-driving the car? With data like the ignition timing and injector pulse width available at the instant of the hiccup, your mechanic--or you--can probably figure out what happened.
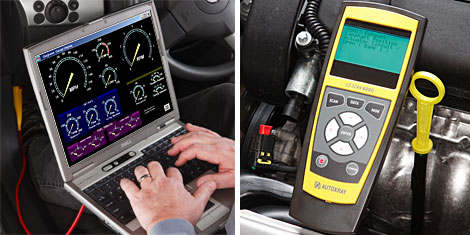
Pro-grade scan tools have graphic functions that let a technician watch several parameters onscreen while the engine is running. Consumer-grade machines generally don't. But some higher-end ones, in the several-hundred-dollar range, have an interface for your laptop or even your desktop. No, you don't have to move your computer to the front lawn or garage--the scan tool has enough memory and battery life to let you plug it in indoors with the car cable disconnected.
There are also interfaces and software that let you hook up your computer directly to the OBD II connector via USB, allow you to look at the data on the computer screen and even make a printout. This increased capability might be a big advantage, although you'll spend nearly as much as you would for a dedicated scan tool--from $150 to $400.
54ca6c16c98bc_-_scan2-470-0708
>
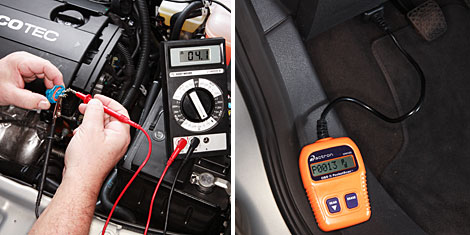
Did the scan tool identify a problem with some sensor such as the camshaft position sensor? Get out the multimeter and check the sensor's output to see if it's okay.
Code readers shouldn't be confused with scan tools. They're a less expensive and less capable diagnostic tool. But if all you need is codes, and to shut off the MIL light, they're fine.
54ca6c17312d3_-_scan1-470-0708
>
PC interfaces allow you to replicate a scan tool with your laptop or desktop. The big graphic display is a plus, but to us, the laptop is a little too fragile for everyday shop use.
More sophisticated scan tools such as this give you more data, a bigger screen, alternate languages and the ability to interface with a PC for enhanced capability. These tools can be upgraded over the Web with the latest firmware.
Your scan tool shows P0131, a general oxygen sensor code. No problem, you say, I'll just pop in a new sensor, which should clear up the problem, as well as the P0301 misfire code obviously caused by the bad sensor. Well, $97 for an oxygen sensor and special sensor socket later, the malfunction indicator lamp is still on. The oxygen sensor code was caused by a wire harness to the sensor. The light stays off after you fix the wiring, until one particular stretch of bad road. The misfire detector in the powertrain control module looks for tiny spikes in the rotational speed of the crankshaft, caused by missing firing pulses. When one cylinder skips, the crank slows down for a millisecond or two. Driving the right speed over a washboard road has the same effect, slewing the crankshaft rotation around enough to make the PCM toss out trouble codes. And there's the danger of diagnosing from a trouble code and throwing parts at a problem without understanding it. Modern engines and their onboard control systems are best repaired by someone who understands how the system is supposed to work in the first place. As always, for a lot of this kind of work, you'll need a proper shop manual.
54ca6c178c2e7_-_scan4-470-0708
Source: http://www.popularmechanics.com/cars/how-to/a3293/4267896/
 
More Auto Diagnosis Tool information Please search :(World OBD2 Auto Diagnostic Tool Mall) www.wobd2.com

mardi 21 juin 2016

Scania SDP 2.26 vs. XCOM 2.27 Software Download

Here, wobd2.com offer the newest Scania truck diagnostic software SDP 2.26 and XCOM 2.27 (old version also provided), and some differences between SDP3 and XCOM software are listed.
Part 1 - Scania software download
Free download Scania Diagnostic Program 3
SDP3 2.26 (free but not tested)
SCANIA.SDP3.2.26.0.part1.rar
http://nitroflare.com/view/B3D5B446F9BD79B/SCANIA.SDP3.2.26.0.part1.rar
SCANIA.SDP3.2.26.0.part2.rar
http://nitroflare.com/view/03CAED7306CA3BB/SCANIA.SDP3.2.26.0.part2.rar
SDP3 2.25.rar (free but not tested)
https://mega.nz/#!y9dDlCxC!LZwdhjuwExxuWolbtLe6QQugBqzQ9ZzjYlez_wTfZKM
SDP3 2.24 (TESTED)
http://www.chinaautodiag.com/html/scania-vci-3-sdp3-v224-free-download-23538.html
SDP3 2.23 (TESTED)
SDP3 V2.21 (free but not tested)
https://mega.co.nz/#!60QE0Q7Y!0tOGTMkipBIOdr8vGuVfqMwTYondVJaa0f92Sd1pEsQ
SDP3 2.17 (TESTED)
https://mega.co.nz/#!r4pzzJSY!wBos3UBiDp4ndNll5vqAW984aOcFZjLLY5ibMmln_58

Free download XCOM Developer Software
XCOM 2.27 (free but not tested)
http://www.chinaautodiag.com/html/scania-vci-2-truck-diagnostic-tool-software-free-download-3476.html
XCOM 2.26 (free but not tested)
https://mega.co.nz/#!jowzgZpQ!UnWsATM-kifPx7y0QQWxIqnaWm4fMz6DBWx5S7sIVJA
XCOM 2.27 & XCOM 2.27 (TESTED)
NOTE: DISABLE ANY ANTI-VIRUS SOFTWARE BEFORE DOWNLOADING. OTHERWISE, WILL CAUSE DAMAGE TO SOFTWARE.

Part 2 - Scania SDP3 vs. XCOM
- both work with Scania VCI 2 or VCI 3 adapter
- Operating system: 
SDP3: windows XP
XCOM: Windows 2003/XP/Vista/7/8
- Language
SDP3: German, English,Spanish, Finnish, French, Italian,Japanese, Korean, Dutch, Polish, Arabic, Portuguese, Russian, Swedish,Turkish, Chinese, Traditional Chinese, Romanian
XCOM: English only
- Activation
SDP3: Free active first time, and then 10USD one time for activation
XCOM: No Need Activation
- Function
SDP3:
Stored fault codes, proposals for remedial action and delete option.
Control unit configuration and settings.
Information about electrical components and their location.
Input and output signals.
Activation of components.
Spare part programming.
Circuit diagrams. For each circuit there is a diagram which clearly shows how the particular circuit is implemented in the respective vehicle.
Chassis data. The vehicle gives the program a description of itself and how it is configured.
User functions. In order to meet service market requirements to work more effectively, there is an option to troubleshoot via user functions, e.g. cruise control.
Use of the program requires a PC, a USB key and a VCI2. These components must comply with the applicable system requirements, so that the program will operate correctly.
XCOM:
After replacement ecu you may test new one, and code it. If you have changed gearbox to other type, you may adapt it. You may select different rpm/torque ratio, for better performance and much more. XCOM immo operations are available too, like pairing immo, depairing COO7 or S6-7-8. XCOM is capable of some other interesting functions, remove Adblue, clean EGR, change chassis ID/VIN, get mileage, increase truck power, recovery/reset ECU, unlock ECU without pin etc

More Product information Please search :(World OBD2 Auto Diagnosis Tool Mall) www.wobd2.com

dimanche 19 juin 2016

How to use VCDS

VCDS allows you to turn a Windows PC into a powerful diagnostic tool for VW/Audi/SEAT/Skoda vehicles from 1990 through the latest models. Before plugging anything in, you must first install VCDS software on your PC. TheVCDS Pro-Kit comes with a CD containing our software as well.


Step #1 Go to our website and click on Download at the top of the screen to download and install the latest version of VCDS: www.Ross-Tech.com Run the installation file that you have downloaded and follow the onscreen instructions and allow VCDS to install in its default directory. You will also be given a screen with several choices for UBS drivers, it is recommended to leave these in their default settings unless instructed otherwise by Ross-Tech. Make sure to allow the USB drivers to install after the main program installation has finished. ► The VCDS Pro-Kit comes with a CD containing our software as well. If possible it is always a good idea to download the latest version from our website.
Step #2 Connect the USB end of your USB Interface or the Serial end of your Serial Interface to the correct port on your PC. If your PC is further from the vehicle’s diagnostic port than 6 feet, connect an approved Extension Cable between the PC and the Interface. The appropriate extension is included in the ProKit and additional ones are available from our web store. Getting Started - Section 1-B

Step #3 (USB Only)► If you are using a Serial Interface then you can proceed to
step #4. If you are using a USB Interface, a message like this should pop up: ► The drivers many install automatically in Windows 7 or Vista. If you are using XP or W2000, click on the Found New Hardware message and the Found New Hardware Wizard should start up. If you are prompted with the choice, pick “No, Not This Time” when asked if you want to connect to the Internet to search for drivers. Select "Install the software automatically (Recommended)" then click [Next >] The process should be automated but you may need to click “Continue Anyway” part way through the process. If, for some reason, you installed the USB Interface without following the above instructions, and VCDS does not work correctly, go into your PC’s Device Manager while the USB Interface is connected. You can find the Device Manager by right-clicking on My Computer in XP or on Computer in Vista or 7. Select Manage to bring up Computer Management. On the left side of the screen under System Tools, select Device Manager. Find the “VCDS Compatible USB Interface” or similar and delete it. It may be under “Other Devices” or under “Universal Serial Bus Controllers”. Next, unplug the USB Interface from your PC, wait 5 seconds and plug it back in. Proceed with the installation starting on Step 2.

Step #4 ► Connect the car end of your Interface to your vehicle’s Diagnostic Port. ► ◄ If your vehicle has a 2x2 port (some pre-1996 vehicles), then use the optional 2x2 Adapter between the Interface and the ports in the car. This is included in the Pro-Kit. Turn the vehicle’s ignition switch to the ON position. Make sure the key is turned far enough that the dash lights are fully illuminated. The engine may either be running or stopped. Getting Started - Section 1-C

Step #5 ► Start the VCDS program on your PC through either the Start Menu or the VCDS icon on your Desktop.


Step #6 From the Main Screen in VCDS click the [Options] button to go into the Options screen.

Step #7 Once you are in the Options Screen, Select the correct port for your PC’s USB Port (USB) or Serial Port (typically COM1 or COM2) and click the [Test] button. Ensure that VCDS finds your interface. Getting Started - Section 1-D

Step #8 ► You should see a message like this:  If the Interface Status is “Not Found!”, check the connections at the car and PC. Make sure both are plugged in securely. Serial Interfaces get their power from the vehicle so they will not be recognized at all if not plugged into a car.  Adapter Type should always be “RossTech” followed by the name of the Interface such as “HEX-USB+CAN”.  Version indicates the firmware version of your Interface. It may be updated by new versions of VCDS,

if so follow the prompts on the screen. Interface Name: Expected Test Result: HEX-USB+CAN, HEX-COM+CAN K1: OK K2: OK CAN: OK (when tested on a car with CAN) CAN: Not Ready (on cars w/o CAN) KII-USB, KEY-USB, KEY-COM,HEX-USB, HEX-COM K1: OK K2: OK CAN: Not Supported Micro-CAN K1: Not Supported K2: Not Supported CAN: OK (when tested on a Mk5 based car with CAN) If K1 or K2 status are ”Short to Ground” or “Short to +12V”

then you may have a short or an open circuit in the car’s diagnostic port, often caused by the Aftermarket Radio Problem,

 See this page on our website for more info: http://www.wobd2.com

Once you have tested successfully, click [OK] then click [Save] to apply this configuration, you will be returned to the Main Screen. Click on [Select] to view the Select Control Module Screen. Select one of your car's Control Modules such as Engine. Note: Your car will not have all the Control Modules listed in VCDS, only the functional ones that were installed in your vehicle. See the Applications Page for your car on our Website for more info: www.Ross-Tech.com/vag-com/cars/applications/ After VCDS has connected, click on [Fault Codes] to check for Fault Codes (DTCs). Repeat the process for each of your car's Control Modules. If you encounter problems, see the FAQ on our website first:


If you still have problems, feel free to chat us with full details about your PC and vehicle, preferably while you are in front of both:

mercredi 15 juin 2016

How to use X100 pro change km for Mercedes ML350 2011

Share an instruction on how to change mileage for Mercedes-Benz ML S350 2011, with OBDSTAR X-100 pro (x-300 pro) auto key programmer.
You need:
Obdstar X-100 PRO key programmer (or X300M )
Note:
3 types of X100 PRO that OBDSTAR developed
SK164: X100 PRO C+D TypeImmobilizer + Odometer + OBD functiion
SK164-B: X-100 PRO C Type for IMMO + OBD Function
SK164-C: X100 PRO D Type for Odometer + OBD Function

(here, for mileage adjustment, both SK164 and SK164-C are OK)

Odometer correction procedure:
current mileage: 103744 km
X-300-PRO--2011(1)
connect x-100 pro tool to the car
turn ignition on
make the x100-pro start
select VEHICLES-> MILEAGE ADJUSTMENT-> BENZ-> BENZ V30.00
X-300-PRO--2011-(2) X-300-PRO--2011-(3) X-300-PRO--2011-(4) X-300-PRO--2011-(5)
initializing...
authorizing...
select ML-> S164
X-300-PRO--2011-(8) X-300-PRO--2011-(9)


input the mileage of the adjustment: 131030
X-300-PRO--2011-(10) X-300-PRO--2011-(11)

communication...
calibration is successful
disconnect the insurance, on the insurance-after 5 s(seconds)!
X-300-PRO--2011-(13) X-300-PRO--2011-(14) X-300-PRO--2011-(15) X-300-PRO--2011-(16)
now, the corrected mileage: 131008 km
X-300-PRO--2011-(17)
BENZ ML350 odometer correction success!